4 Corners of Bottom of Feet, Seated and Standing
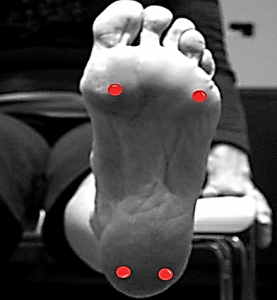 Anatomical significance: Intrinsic and extrinsic muscles of the foot, 3 arches of the foot Contraindications: Arthritis, bunions Checklist: Instruction: Session 1 – 10.
- Weave awareness throughout standing and seated
Foot opener in Chair (Mulabandasana variation)
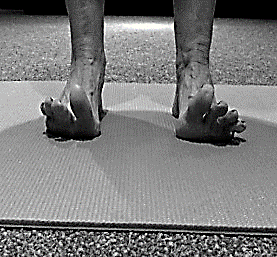 Pose Language: Expand and open Anatomical significance: Intrinsic and extrinsic muscles of the foot, 3 arches of the foot Contraindications: Arthritis, bunions Instruction:
- Session 1 – 8
- Weave awareness throughout standing and seated
Twist in seated or standing (Bharadvajasana and Katichakrasana variation)
Pose Language: Keep hips (especially opposite to twist side) rooted Anatomical significance: Piriformis, obliques, erector spinae, sternocleidomastoid  Contraindications
- Blood pressure (high and low)
- Diarrhea
- Headache
Modifications for specific issues
- Balance issues
- Move slower and to a lesser extremes in either direction
- Use chair if standing
- Weak knees
- Use a block to support thighs from knocking in
- Draw the strength of the thighs upward, make the knee caps smile
- Lower back pain
- Reduce curve of spine
- Twist from mid-spine not at hip
- Breath fully into side body you are twisting into
- Arm and shoulder weakness
- Bring hands to hips
- Use a chair to stabilize
Checklist
- Lead with opposite eye from the direction you are twisting to
- Twist from mid-spine
- Don’t stress in shoulders or neck
Instruction
- Session 1 -8
- Weave the pose into the intervention sequence
- Use chair when standing
Crescent Side Stretch standing or seated (Chandrasana)
Pose Language: Breath into and expand over the side you are leaning towards Anatomical significance Intrinsic and extrinsic muscles of the foot, diaphragm, quadriceps, iliopsoas, pectorals, Erector Spinae, Serratus anterior, Teres minor 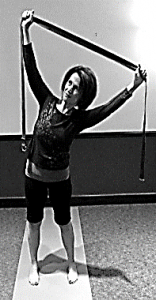 Contraindications: Shoulder or neck strain, Low blood pressure, Headaches Modifications for specific issues
- Flat feet
- Focus on all four corners of foot, pulling up
- More energy in heel
- Weak knees
- Use a block to support thighs from knocking in
- Draw the strength of the thighs upward, make the knee caps smile
- Slight bend in knees if needed
- Lower back pain
- Reduce curve of spine
- Breath fully into side body
- Reduce external rotation of hips
- Root through foot on side you are leaning away from
- Arm and shoulder weakness
- Bring hands to hips
- Use a chair to stabilize
Checklist
- Root through foot of lengthened side body
- Protect against overarching of lumbar spine
Instruction
- Session 3 -8
- Weave the pose into the intervention sequence
- Use chair when standing
Cat Cow Standing and Seated (Marjaryasana, Bitilasana)
Pose Language: Let the breath lead the movement Anatomical significance: Obliques, piriformis, erector spinae Contraindications: Neck issues Modifications for specific issues
- Balance issues
- Move slower and to a lesser extremes in either pose
- Use chair if standing
- Weak knees
- Use a block to support thighs from knocking in
- Draw the strength of the thighs upward, make the knee caps smile
- Lower back pain
- Reduce curve of spine
- Breath fully into side body
- Arm and shoulder weakness
- Bend elbow
Checklist
- Focus on transitioning pose by leading with the breath
Instruction
- Session 1 -8
- Use chair if needed when standing
Knee to chest stretch seated (pawanmuktasana variation)
Pose Language: Draw the navel up and in or zip up the core Anatomical significance Contraindications Modifications for specific issues
- Balance issues
- Place opposite hand on chair, lift leg with only one hand
- Weak knees
- Bend only to your comfort level
- Lower back pain
- Hold on loosely to leg
- Keep back long, don’t curve or hump out back
- Arm and shoulder weakness
- Hold on loosely to the leg
Checklist
- Remember to breath as you hold the posture
Instruction
- Session 2 -8
- Weave the pose into the intervention sequence
Leg Stretch Seated (Utthita Hasta Padangusthasana)
Pose Language: Extend out though bottom of feet, draw the thigh into the hip Anatomical significance: Quadriceps, hamstrings, abductors, external rotators of pelvis, psoas, iliacus, rectus femoris, gracilis and tibialis posterior Contraindications: Diarrhea, Headache, High blood pressure, Lower back: Quadratus lumborum injury (in hiking hip) Modifications for specific issues
- Balance issues
- Place opposite hand on chair, lift leg with only one hand
- Weak knees
- Engage thigh strength
- Lower back pain
- Hold on loosely to leg
- Keep back long, don’t curve or hump out back
- Arm and shoulder weakness
- Hold on loosely to the leg
Checklist
- Remember to breath as you hold the posture
Instruction
- Session 2 -8
- Weave the pose into the intervention sequence
Stand/Sit transition
Pose Language: Use the breath Anatomical significance: Hamstrings, quadriceps, internal/external obliques Gluteus maximus and medius Contraindications: High Blood pressure (sitting), Low blood pressure (standing) Modifications for specific issues
- Balance issues
- Use chair seat for support
- Engage thigh strength
- Plant feet square
- More energy in heel
- Weak knees
- Draw the strength of the thighs upward, make the knee caps smile
- Lower back pain
- Breath fully into side body
- Reduce external rotation of hips
Checklist
- Go slow and use the breath as your guide
Instruction
- Session 1 -8
- Weave the pose into the intervention sequence
Mountain (Tadasana)
Pose Language: Root through the feet (earth) extend through the spine and the top of the head (sky) Anatomical significance: Intrinsic and extrinsic muscles of the foot, 3 arches of the foot, diaphragm, quadriceps, iliopsoas Contraindications: Headache, Insomnia, Low blood pressure Modifications for specific issues
- Flat feet
- Focus on all four corners of foot, pulling up
- More energy in heel
- Weak knees
- Use a block to support thighs from knocking in
- Draw the strength of the thighs upward, make the knee caps smile
- Lower back pain
- Reduce curve of spine
- Breath fully into side body
- Reduce external rotation of hips
- Arm and shoulder weakness
- Bring hands to hips
- Use a chair to stabilize
Checklist
- Protect knees with minimal external rotation of hips. Make sure the knees line up with feet and that the knees do not hyperextend past the toes
- Protect against overarching of lumbar spine
Instruction
- Session 1 -8
- Weave the pose into the intervention sequence
- Use chair when standing
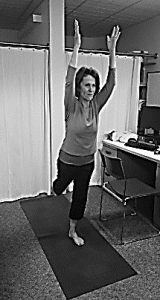
Arms Over Head in Mountain or Seated (Tadasana Urdhva Hastasana)
Pose Language: Relax or drop the shoulders Anatomical significance: Intrinsic and extrinsic foot muscles, diaphragm, quadriceps, iliopsoas, pectorals 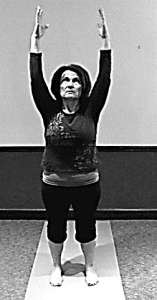 Contraindications: Shoulder or neck strain, Low blood pressure, headaches Modifications for specific issues:
- Flat feet
- Focus on all four corners of foot, pulling up
- More energy in heel
- Use a block to support thighs from knocking inWeak knees
- Draw the strength of the thighs upward, make the knee caps smile
- Lower back pain
- Reduce curve of spine
- Breath fully into side body
- Reduce external rotation of hips
- Arm and shoulder weakness
- Bring hands to hips
- Use a chair to stabilize
Checklist:
- Protect knees with minimal external rotation of hips. Make sure the knees line up with feet and that the knees do not hyperextend past the toes
- Protect against overarching of lumbar spine
Instruction
- Session 1 -8
- Weave the pose into the intervention sequence
- Use chair when standing
Forward Fold (Uttanasana)
Pose Language: engage thighs Anatomical significance: Vastus medialis, knee extensor, hamstrings, piriformis, gastroc/soleus, spine Contraindications: Back injuries including osteoporosis, High Blood pressure (moving into pose), Low blood pressure (moving out of pose) Modifications for specific issues 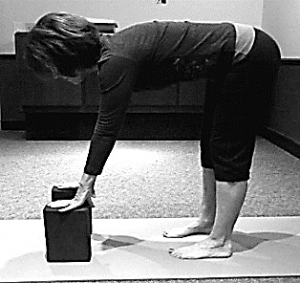
- Balance issues
- Use chair seat for support
- Engage thigh strength
- Plant feet square
- Weak knees
- Draw the strength of the thighs upward, make the knee caps smile
- Bend knees deeper
- Lower back pain
- Breath fully into side body
- Reduce external rotation of hips
- Bend knees deeper
Checklist
- Go slow and use the breath as your guide
- Draw in navel
- Lead the fold with your heart
- Tuck in chin
Instruction
- Session 1 -8
- Weave the pose into the intervention sequence
- Use chair when standing
Down Dog with Chair (Adho Mukha Svanasana)
Pose Language: root though heels lift inner arms Anatomical significance: Rectus Femoris, Gastrocnemius, Hamstrings, Gluteus maximus, triceps, deltoids, serratus anterior, latissimus dorsi Contraindications: Wrist or hand issues, Diarrhea Modifications for specific issues
- Balance issues
- Use chair seat for support
- Engage thigh strength
- Plant feet square
- Weak knees
- Draw the strength of the thighs upward, make the knee caps smile
- Bend knees deeper
- Lower back pain
- Breath fully into side body
- Bend knees deeper
Checklist
- Bend both knees
- Draw in navel
- Lead the fold with your heart
- Tuck in chin
Instruction
- Session 4 -8
- Weave the pose into the intervention sequence
- Use chair when standing
Chair (Utkatasana)
Pose Language: Ground through heels, Zig/Zag principle Anatomical significance: Rectus abdominis, Gluteus maximus, medius and minimus, adductor group, quadriceps and hamstrings, tibialis anterior, soleus and intrinsic muscles of the feet Contraindications: Headaches, Low blood pressure, Severe Hypertension, Seated: Colostomy or Hemorrhoids Modifications for specific issues
- Flat feet
- Focus on all four corners of foot, pulling up
- More energy in heel
- Weak knees
- Use a block to support thighs from knocking in
- Draw the strength of the thighs upward, make the knee caps smile
- Lower back pain
- Reduce curve of spine
- Breath fully into side body
- Reduce external rotation of hips
- Arm and shoulder weakness
- Bring hands to hips
- Use a chair to stabilize
Checklist
- Protect knees with minimal external rotation of hips. Make sure the knees line up with feet and that the knees do not hyperextend past the toes
- Protect against overarching of lumbar spine
Instruction
- Session 1 and 2
- Use a wall as in modification 1 or 2
- Use a chair as in modification 3
- Session 3 and 4
- Use chair only as needed
- Introduce modification 4 and 5
- Advance people at their own pace, remind them that this is not a competition and that their body may have a different ability to do the pose from day to day
- Session 5 and 6
- Practice moving right into chair, without any use of the wall or chair for support
- Introduce advanced foot modification
- Start to introduce the pose into the intervention sequence
- Session 7 and 8
- Weave the pose into the intervention sequence
Basic pose: are used to describe one side, substitute opposite left or right when switching to other side Begin by standing with chair next to you on your side (left). Turn the chair around so that the back is closest to you. Place both hands on chair for balance. Make sure both feet are facing forward and your heels are behind your toes. Place the block between your tights (see below). Apply just enough pressure, inward, to keep the block in place. Slowly, extend your hips back by bending your knees. Go only as low as to provide a moderate bend in the knees. Make sure you can still see your toes, as not to over bend knees. Keep a slight curve in the small of the spine. Do not bend torso past 90 degrees at hip joint. There will be a zig/zag form to your body: heels are rooted down, knees are bent (hip distance apart and extending out towards little toes), hips back and top of the head is lifted. Block Placement: Place the block between your tights. Apply just enough pressure, inward, to keep the block in place. Advancement 1 is the same as the basic pose, however your arm (right) is raise up above the head. Relax/soften the raised arm into the shoulder joint. Your palms face in. Do only if you feel safe, balanced and have no pain. Advancement 2 is the same as basic pose; however both arms are raised up above the head. Relax/soften the raised arm into the shoulder joint. Your palms face in. Do only if you feel safe, balanced and have no pain. Advancement 3 is the same as advancement 2, however here we are using the advanced foot position. This position uses a folded towel under both feet. The towel is positioned at the base of the toes. It will create a lift that may feel off balancing. Do only if you feel safe, balanced and have no pain. Tips for Chair: root into feet* be on 4 corners of feet not just toes* keep feet hip distance apart* image a block between the shins and you are squeezing the block in* knees bend even with hips/feet* see your toes* zig/zag of motion: find form, root heels, bend knees, extend hips, lift navel in towards spine, lift through top of head, breath. Repeat and deepen zig/zag* relax/soften arms in shoulder joint* top of head lifts* chin draws in along jaw line* find visual focal point* have a steady and even breath
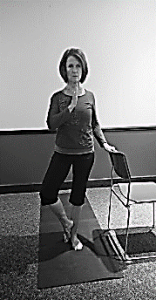
Tree (Vrksasana)
Pose Language: Keep balancing side body bright Anatomical significance: Standing leg: quadriceps soleus, gastrocnemius, Tensor fascia lata, Gluteus medius and minimus. Balancing leg: Psoas, piriformis, sartorius, gracilis and gluteus maximum Standing foot: intrinsic muscles of foot and ankle Contraindications: Inner ear issues, Vertigo, Balance disorders, Meniere’s disease, Headaches, High Blood pressure: if raising arms over head Modifications for specific issues
- Balance issues
- Root through 4 corners of the balancing foot
- Breath into and extend the side body on the balancing foot side
- Weak knees
- Balancing leg: Keep a slight give in knee. Engage thigh muscle to protect knee
- Bent, lifted leg: Only extend or rotate knee to an angle that is safe and comfortable
- Lower back pain
- Reduce curve of spine
- Breath fully into side body
- Bent, lifted leg: reduce external rotation of hips
- Arm and shoulder weakness
- Bring hands to hips
- Use a chair to stabilize
Checklist
- Root down into balancing foot
- Keep the balancing side body extended/long
- Allow pivoting knee to be comfortable, maybe that means it is facing more forward
- Lift navel in towards spine
- Relax/soften arms in shoulder joint
Instruction
- Session 1 and 2
- Use a chair
- Foot position one or two
- Session 3 and 4
- Use chair only as needed
- Introduce a slow transition to advancement one and two
- Advance people at their own pace, remind them that this is not a competition and that their body may have a different ability to do the pose from day to day
- Session 5 and 6
- Introduce supplements versions if ready
- Start to introduce the pose into the intervention sequence
- Invite individuals to look side to side. Use support if needed
- Introduce supplements versions if ready
- Session 7 and 8
- Weave the pose into the intervention sequence
Level one: Tree Variation Basic Pose: () are used to describe one side, substitute opposite left or right when switching to other side Begin by standing with chair next to you on your side (left). Turn the chair around so that the back is closest to you. Place one hand (left) on chair for balance. Make sure both feet are facing forward and your heels are behind your toes. Place your feet in one of two optional positions. 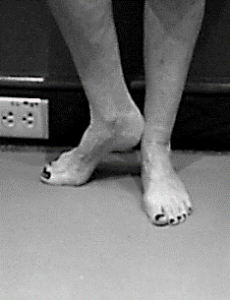 Foot Position 1: Start with both feet parallel, hip distance apart. Make sure both feet are facing forward and your heels are behind your toes. Keep the foundation foot (left) where it is. Pivot the heel of the balancing foot (right) up the ankle of the foundation foot (left). Keep your knee (right) in a comfortable position. The knee (right) does not have to look completely to the right or side. Foot Position 2: Start with both feet parallel, hip distance apart. Make sure both feet are facing forward and your heels are behind your toes. Keep the foundation foot (left) where it is. Pivot the heel of the balancing foot (right) up the inner edge of the foundation calf
 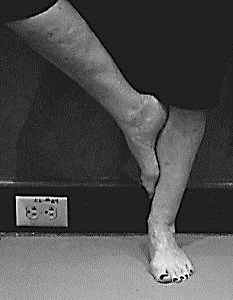 (left). Keep your knee (right) in a comfortable position. The knee (right) does not have to look completely to the right or side. Keep your hand (left) on the chair. Extend your other hand (right) up your heart center. Palm of hand (right) is facing in. Do only if you feel safe, balanced and have no pain. Advancement 1 follows all of the instructions of the basic pose. After finding your balance with your hand (right) up your heart center, place your other hand (left) at heart center so the palms are touching. You will only be balancing on one foot and the other toes (foot position 1) or just the one foot (foot position 2). Do only if you feel safe, balanced and have no pain Advancement 2 Begin with chair (to left) and place hand (left) on chair. Balance on foot (left) that is on side by chair. Lift your knee (right) up in front of you, with your thigh (right) parallel to floor. Foot (right) is engaged, toes pointing up, parallel to floor. Extend your other hand (right) up your heart center. Palm of hand (right) is facing in. Do only if you feel safe, balanced and have no pain. Advancement 3 is the same at the basic pose in level 2, however, after finding your balance with your hand (right) up your heart center, place your other hand (left) at heart center so the palms are touching. Do only if you feel safe, balanced and have no pain. Tips for Tree: root down into balancing foot* keep the balancing side of the body extended/long* allow pivoting knee to be comfortable, maybe that means it is facing more forward* keep hips even, facing forward* * lift navel in towards spine * relax/soften arms in shoulder joint* top of head lifts* chin draws in along jaw line* find visual focal point* have a steady and even breath
Supplements to Tree Variation (Given out by the discretion of the teacher):
- Level 2: Tree Variation
- Basic Pose: () are used to describe one side, substitute opposite left or right when switching to other side
- Begin with basic pose in level 2: chair (to left), hand (left) on chair, balance on foot (left), lift knee (right) up in front of you, thigh (right) parallel to floor, foot (right) is engaged and other hand (right) up your heart center. Pulsate the knee (right) between straight ahead and out to side (right). As you bring knee (right) to side (right) allow your vision to move to the opposite side (left). As you bring your knee (right) back to center, bring vision along the horizon, back to center. Layer the breath over the pulsation of the arms. As you lower your arms and look to the side (right), exhale. As you bring your arms overhead and look straight ahead, inhale. Do only if you feel safe, balanced and have no pain
- Basic Pose: () are used to describe one side, substitute opposite left or right when switching to other side
Advancement 1 is the same at the basic pose in level 3, however, after finding your balance with your hand (right) up your heart center, place your other hand (left) at heart center so the palms are touching. Repeat pulsation of knee (right) to side (right), vision to opposite side (left) and knee (right) and vision back to center. Layer the breath over the pulsation of the arms. As you lower your arms and look to the side (right), exhale. As you bring your arms overhead and look straight ahead, inhale. Do only if you feel safe, balanced and have no pain.
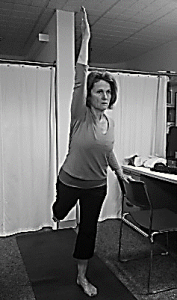
Balancing Knee lift (Utthita Hasta Padangusthasana variation)
Pose Language: Keep balancing side body bright Anatomical significance: Quadriceps, hamstrings, abductors, external rotators of pelvis, psoas, iliacus, rectus femoris, gracilis and tibialis posterior Contraindications: Diarrhea, Headache, 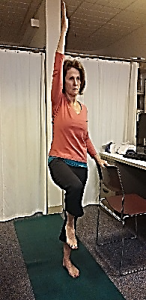 High blood pressure, Lower back: Quadratus lumborum injury (in hiking hip) Modifications for specific issues
- Balance issues
- Root through 4 corners of the balancing foot
- Breath into and extend the side body on the balancing foot side
- Weak knees
- Balancing leg: Keep a slight give in knee. Engage thigh muscle to protect knee
- Bent, lifted leg: Only extend or rotate knee to an angle that is safe and comfortable
- Lower back pain
- Reduce curve of spine
- Breath fully into side body
- Bent, lifted leg: reduce external rotation of hips
- Arm and shoulder weakness
- Bring hands to hips
- Use a chair to stabilize
Checklist
- Root down into balancing foot
- Keep the balancing side body extended/long
- Allow pivoting knee to be comfortable, maybe that means it is facing more forward
- Lift navel in towards spine
- Relax/soften arms in shoulder joint
Instruction
- Session 3 and 4
- Use chair
- Advance people at their own pace, remind them that this is not a competition and that their body may have a different ability to do the pose from day to day
- Session 5 and 6
- Use chair as needed
- Start to introduce the pose into the intervention sequence
- Session 7 and 8
- Weave the pose into the intervention sequence
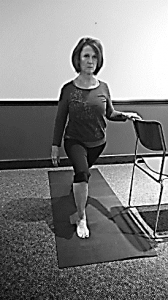
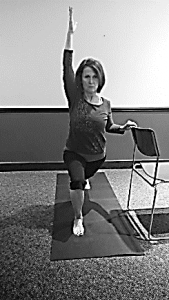
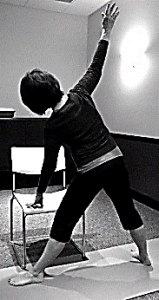
High Lunge (Alanasana)
Pose Language: Keep Hips aligned and back leg straight Anatomical significance: Rectus abdominis, obliques, psoas, quadriceps and hamstrings, front leg: sartorius, semitendinosus, back leg: Rectus femoris, iliacus, soleus, gastrocnemius, Contraindications: Heart problems, High blood pressure, Achilles Tendonitis or Bursitis, Torn Meniscus, Plantar Fasciitis, Anterior Cruciate Ligament (ACL), Hyperlordosis, Spondylolisthesis, Spondylolysis, Severe Lumbar Stenosis, Modifications for specific issues
- Balance issues
- Wider stance and longer (front to back) distance of feet will allow for greater balance.
- Keep feet positions at or greater than hip distance
- Weak knees
- Front leg: Do not hyperextend knee, 90% or greater
- Back leg: draw the strength of the thighs upward, make the knee caps smile
- Lower back pain
- Reduce curve of spine
- Breath fully into side body
- Back leg: reduce external rotation of hips
- Arm and shoulder weakness
- Bring hands to hips
- Use a chair to stabilize
Checklist
- Protect front leg knee with by lining up with feet ( towards little toe) and that the knee does not hyperextend past the toes
- Protect against overarching of lumbar spine
- Hips point forward
Instruction
- Session 1 and 2
- Use a chair
- Introduce all modifications
- Session 3 and 4
- Use chair only as needed
- Introduce a slow transition from standing to full pose
- Advance people at their own pace, remind them that this is not a competition and that their body may have a different ability to do the pose from day to day
- Session 5 and 6
- Start to introduce the pose into the intervention sequence
- Invite individuals to look up and down Use support if needed
- Session 7 and 8
- Weave the pose into the intervention sequence
 Level one: Basic High Lunge Basic Pose: () are used to describe one side, substitute opposite left or right when switching to other side Begin by standing with chair next to you on your side (left). Turn the chair around so that the back is closest to you. Place one hand (left) on chair for balance. Turn the chair around so that the back is closest to you. Make sure both feet are facing forward and your heels are behind your toes. With your back foot (left), step back a wide, comfortable distance. Keep your back foot (left) on the base of the toes; do not bring your heel down. Your front knee (right) will bend at an angle. Do not let the knee move forward past the toes. You should be able to see your toes. Your back leg (left) will be straight. Do not lock the back leg (left), have a tiny give in the back knee (left). Vision is on horizon. Do only if you feel safe, balanced and have no pain. Foot Placement
 Advancement 1 is the same at the basic pose, however you can lift one hand and arm (right) up. Point the arm straight up towards the ceiling. Relax/soften the raised arm into the shoulder joint. Do only if you feel safe, balanced and have no pain.
  Advancement 2 is allowing both hands and arms to lift up to ceiling, using only your feet for support. Raise both arms up towards the ceiling. Relax/soften both arms into the shoulder joint. Have the palms face each other. Repeat, by switching legs. Then repeat again so that you do both sides 2 times. Do only if you feel safe, balanced and have no pain. Tips for High Lunge: *keep hips even, facing forward*don’t over extend the front knee*keep back leg straight with soft knee*lift navel in towards spine*relax/soften arms in shoulder joint* have a steady and even breath Supplements to High Lunge, Level 2 (Given out by the discretion of the teacher)
Level 2: High Lunge with visual pulsation
Basic Pose: () are used to describe one side, substitute opposite left or right when switching to other side Begin with standing next to chair (to left), place hand (left) on chair. Front knee (right) is bent, back leg (left) is straight and back foot (left) is on the base of the toes. Lift arm (right) up to ceiling. Pulsate your arm to side (right) and back up to ceiling. Look straight ahead, with arm (right) up and then pulsate vision on horizon to side (right) you are bringing arm down to and then back to center when arm is back up over head. Layer the breath over the pulsation of the arms. As you lower your arm (right) and look to the side (right), exhale. As you bring your arm (right) overhead and look straight ahead, inhale. Do only if you feel safe, balanced and have no pain. 
 Advancement 1 is the same at the basic pose in level 2, however you can lift both arms up to ceiling and pulsate them to either side and back up to ceiling. Track your vision on horizon to side (right) as you are bringing arm down to side and then look back to center when arms are back up over head. Layer the breath over the pulsation of the arms. As you lower your arms and look to the side (right), exhale. As you bring your arms overhead and look straight ahead, inhale. Do only if you feel safe, balanced and have no pain.
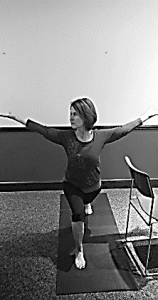
Level 3: straight Leg Variation
Basic Pose: () are used to describe one side, substitute opposite left or right when switching to other side Begin with basic pose in level 2, however your front leg (right) will pulsate between bent knee (right) to straight leg (right). You will move between two positions: 1. Front knee (right) bent, back leg (left) straight, arm to side (right) and vision to side (right) on horizon. 2. Front leg (right) straight, back leg (left) straight, arm (right) up to ceiling and vision is straight ahead. Layer the breath over the pulsation of the arms. As you lower your arm (right) and look to the side (right), exhale. As you bring your arm (right) overhead and look straight ahead, inhale. 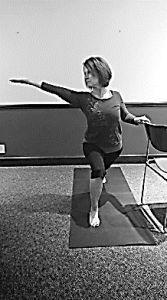
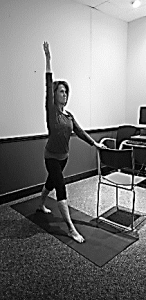
Dancer (Natarajasana)
Pose Language: Extend energy out through lifted heel Anatomical significance: Hamstrings, abductors, iliacus, psoas, rectus femoris Contraindications: High or low blood pressure, Lower-back, knee injury Modifications for specific issues
- Balance issues
- Root through 4 corners of the balancing foot
- Breath into and extend the side body of back leg
- Use chair to stabilize
- Weak knees
- Balancing leg: Keep a slight give in knee. Engage thigh muscle to protect knee
- back leg: Keep leg straight if needed
- Lower back pain
- Reduce curve of spine
- Keep hips level
- Breath fully into side body
- Bent, lifted leg: reduce external rotation of hips
- Arm and shoulder weakness
- Bring hands to hips
- Use a chair to stabilize
Checklist
- Root down into balancing foot
- Keep the both side body extended/long
- Lift navel in towards spine
- Relax/soften arms in shoulder joint
Instruction
- Session 6 – 8
- Use chair as needed
- Advance people at their own pace, remind them that this is not a competition and that their body may have a different ability to do the pose from day to day
- Start to introduce the pose into the intervention sequence
- Weave the pose into the intervention sequence
Dancer Variation Basic Pose: () are used to describe one side, substitute opposite left or right when switching to other side Begin with chair (to left) and place hand (left) on chair. Balance on foot (left) that is on side by chair. Lift your knee (right) up in front of you, with your thigh (right) parallel to floor. Foot (right) is engaged, toes pointing up, parallel to floor. Extend leg (right) back, as if stepping into lunge, but do not bring foot (right) to the floor. Keep back leg (right) straight. There will be a slight forward leaning of your upper body. Pulsate between leg (right) back behind you and knee (right) bent and in front of you. Arm (right) is straight up towards ceiling, when knee is bent, arm glides back along with leg. Vision is on horizon. Layer the breath over the pulsation of the legs. As you extend leg (right) back exhale, as you bring your knee (right) forward and bent, inhale. Do only if you feel safe, balanced and have no pain. 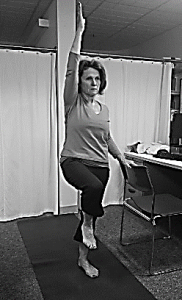
 Advancement 1 is the same at the basic pose in Dancer Variation, however you can lift both arms up to ceiling. Do only if you feel safe, balanced and have no pain.
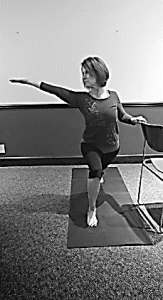
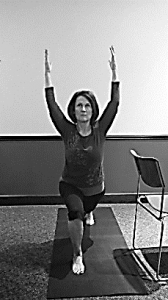
Warrior II (Virabhadrasana II)
Pose Language: Equal pressure in both feet, Forward knee tracking over feet Anatomical significance: Gluteus medius and minimus, Adductor longus, Tensor fascia lata, iliopsoas, quadriceps and hamstrings Contraindications: Diarrhea, High blood pressure, Neck issues 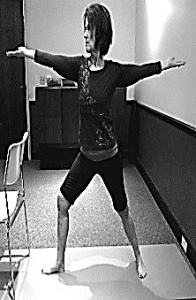 Modifications for specific issues
- Neck problems:
- Don’t turn your head to look over the front hand; continue to look straight ahead with both sides of the neck lengthened evenly.
- Balance issues
- Wider stance and longer (front to back) distance of feet will allow for greater balance.
- Keep feet positions at or greater than hip distance
- Weak knees
- Front leg: Do not hyperextend knee, 90% or greater
- Back leg: draw the strength of the thighs upward, make the knee caps smile
- Back leg: Turn in foot more forward
- Lower back pain
- Reduce curve of spine
- Breath fully into side body
- Back leg: reduce external rotation of hip
- Face hips towards front corner of mat
- Arm and shoulder weakness
- Bring hands to hips
- Use a chair to stabilize
Checklist
- Protect front leg knee with by lining up with feet ( towards little toe) and that the knee does not hyperextend past the toes
- Protect against overarching of lumbar spine
- Face hips towards front corner of mat
Instruction
- Session 3 and 4
- Use a chair
- Session 3 – 8
- Use chair only as needed
- Start to introduce the pose into the intervention sequence
Triangle Pose (Utthita Trikonasana)
Pose Language: Keep both thighs strong, do not hyperextend front knee Anatomical significance: Iliacus, psoas, piriformis, tensor Fascia lata, Gluteus medius, sartorius, hamstrings Contraindications: Diarrhea, Headache, Neck issues, Low blood pressure, Heart Condition: Practice against a wall. Keep the top arm on the hip. High blood pressure: Turn the head to gaze downward in the final pose. Modifications for specific issues
- Balance issues
- Wider stance and longer (front to back) distance of feet will allow for greater balance.
 Keep feet positions at or greater than hip distance
- Add bend to front leg knee
- Weak knees
- Front leg: Straighten leg to your place of comfort
- Back leg: draw the strength of the thighs upward, make the knee caps smile
- Back leg: Turn in foot more forward
- Lower back pain
- Reduce curve of spine
- Breath fully into side body
- Back leg: reduce external rotation of hip
- Face hips towards front corner of mat
- Arm and shoulder weakness
- Bring hands to hips
- Use a chair to stabilize
Checklist
- Protect front leg knee by lining up with feet ( towards little toe)
- Protect against overarching of lumbar spine
- Hips point towards front corner of mat
Instruction
- Session 4 – 8
- Use chair as needed
- Advance people at their own pace, remind them that this is not a competition and that their body may have a different ability to do the pose from day to day
- Weave the pose into the intervention sequence
Tandem Walk
Pose Language: Find foundation in the feet on each step Contraindications: Inner ear issues, Vertigo, Balance disorders, Meniere’s disease, Headaches Modifications for specific issues
- Balance issues
- Use chair for support
- Take wider stance and steps
- Weak knees and Lower back pain
- Take longer steps and bend knees
Checklist
- Find a visual focal point
Instruction
- Session 2 – 8
- Use chair as needed
- Weave the walk into the intervention sequence
Eagle Arms (Garundasana)
Pose Language: Keep shoulders down and chin in Anatomical significance: Trapezius, Infraspinatus, teres Major and minor, serratus anterior and latissimus dorsi Modifications for specific issues
- Balance issues
- Just cross arms, don’t wrap fully
- Sit in chair to cross arms
- Root through 4 corners of feet
- Don’t look to side
- Weak knees and Lower back pain
- Have a slight bend in knees
- Arm and shoulder weakness
- Just cross arms, don’t wrap fully
- Don’t look to side
- Soften shoulders down
Instruction
- Session 3 – 8
- Do only if feel balanced
- Be seated if needed
Wide Leg forward Fold with Chair (Prasarita Padottanasana)
Pose Language: Pull bottom of feet energetically in toward midline Anatomical significance: Hip and leg abductors and adductors, hamstrings, erector spinae and tones the abdominal organs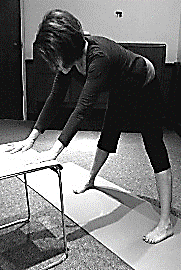 Contraindications: Issues with the lower back Modifications for specific issues
- Balance issues
- Use chair seat for support
- Engage thigh strength
- Plant feet square
- Weak knees
- Draw the strength of the thighs upward, make the knee caps smile
- Bend knees slightly deeper
- Lower back pain
- Breath fully into side body
- Bend knees deeper
Checklist
- Go slow and use the breath as your guide
- Draw in navel
- Lead the fold with your heart
- Tuck in chin
Instruction
- Session 4 – 8
- Weave the pose into the intervention sequence
- Use chair when standing
Wide leg FF with a twist Pose Language: Keep legs and hip stationary Anatomical significance: Hip and leg abductors and adductors, hamstrings, piriformis, obliques, erector spinae, sternocleidomastoid and tones the abdominal organs Contraindications: Diarrhea, Knee issues Modifications for specific issues
- Balance issues
- Use chair seat for support
- Engage thigh strength
- Plant feet square
- Weak knees
- Draw the strength of the thighs upward, make the knee caps smile
- Bend knees deeper
- Lower back pain
- Breath fully into side body
- Bend knees slightly deeper
- Twist in spine not hip
Checklist
- Twist from mid-spine
- Don’t stress in shoulders or neck
Instruction
- Session 4 – 8
- Weave the pose into the intervention sequence
- Use chair when standing
Relaxation Techniques
Body awareness: Begin by setting a timer for 5 minutes, to bring you out of relaxation. Find a quiet room, with no music. Sit in a standard chair (straight back, without much cushion). Place both feet flat on the ground (shoes on or off). Place your hands softly on your lap. Close your eyes if that is comfortable and safe. Follow the next few steps as best as you can. There is no right or wrong way to proceed.
- 4 deep breaths: Take in 4 deep breaths that are slow and deep, but are not overpowering or make you feel short of breath. After the 4 deep breathe, return your breathing to normal.
- Internal scan of the body: Take 2 minutes and allow yourself to internally scan your body with their eyes closed. This is simply being aware of each part of your body. You can start with the soles of your feet, the heaviness of your legs, the chair beneath your hips, the softness of your shoulders, your fingers open on your lap and with the mouth open, the softness of your jaw. (Not all of these specific awareness have to happen, only a few. The purpose is for you to take the time and become aware of how your body feels. There are no judgments of good or bad, just awareness.)
- Breathing exercises take about a two minutes and practice one of the breathing techniques below.
When the timer rings, slowly become aware of your environment. Open the eyes gently and tune into your environment: colors and shapes in the room, sounds, smells and even the air as it brushes over your skin. You may feel dizzy or off balanced. Do not get up until you feel steady. Breathing Exercises: (Choose one of these, once practiced in class)
- Be a witness to your breath: Take the remainder of the time, after the body awareness, to watch your breath. Like an audience member watching a play, just observe your breath. Do not try and change it in any way. Simply notice the passage your breath follows: through the nose and/or mouth. Notice the depth the air extends into your body: does it stop in the chest, the rib cage or deep in the belly. Notice how the air is cooler coming in, and then it is going out. Notice the rhythm of your breath: is there an even inhalation and exhalation. You will do this as a witness, therefore try not to place judgment on your breathing, i.e. this way is right or wrong.
(Breathing exercises continued)
- Count your breath: Once you have worked on witnessing the breath, move to counting the breath. This involves simple counting the inhalation and exhalation. Example: 1st inhalation is 1, 1st exhalation is 2, 2nd inhalation is 3, 2nd exhalation is 4… There is not a number you are trying to reach. This is a simple way to focus the mind. If you lose track of the number you are on or if your mind wanders and you notice you are no longer counting, then just start all over: 1 inhalation, 2 exhalation, 3 inhalation, 4 exhalation…
- Finding a place of ‘pause’ in breathing: Once you have worked on witnessing the breath, focus more on your inhalation and exhalation. Specifically, the place of ‘pause’ in the breath. Become aware of the ‘pause’ that existed after you inhale, but before you exhale. Then again the ‘pause’ that existed after you exhale and before you inhale. This is not holding the breath. Your breathing remains normal.
- Visualize the breath: Another option, once you have practiced witnessing the breath, is to visualize the breath. If you are not a visual person, skip this one. It may be more frustrating than beneficial. First, become very aware of the air as it flows in and out. Enhance this awareness by visualizing a color, of your choosing, on the form of the breath. It helps to have an image of your body being clear first. As you inhale, you visualize the colored air comes into you and internally watch it traveling throughout your body. When you exhale, you will visually see the colored air leave your body. Repeat this with each inhalation and exhalation.
You may feel dizzy or off balanced practicing these breathing exercises. Do not move about the room unless you feel stable.